Charlie's Backpack Semi-Tutorial!
Hi there!
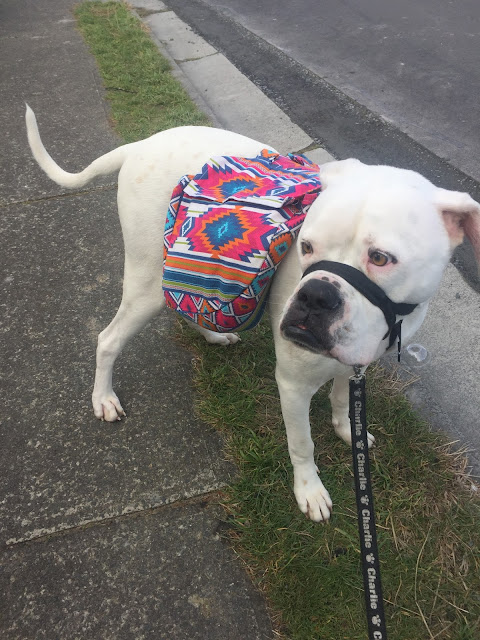
Today I thought I'd make a little tutorial for how I made this fabulous backpack for our American Bulldog, Charles! Charles is just under 50kg now, and is a very relaxed dog for the most part. We decided to make him into a helper dog, to help carry light groceries home from the store for us!
The original bags we used for him were bought on eBay, and unfortunately the zipper broke. So I dismantled them and decided to make a new, sturdier set with the velcro flaps you see here in an attempt to improve their longevity! They backing fabric on the bags and mid-section is a lovely soft fleece too, so Charlie doesn't have nasty scratchy fabric on his coat!
Charlie loves using his bags and helping us carry things home from the store, and I hope your pupper will too!
Follow through behind the cut for a brief rundown of how I made these bags!
Step one: Measure your dog!
Admittedly, I didn't do this step myself. As we had a set of bags that already fit Charlie well, I just sliced those bags up to use as a pattern. However, I will include his back measurement for you, so that you know what size dog I was working with!
Charlie is 80cm/32in from his nose to his booty, and the midsection of the bag is 25cm/10in. I think a good rule of thumb for this section will be to go 1/4 of the dog's length!
Step two: Make your pattern!
This is the measurements and vague outline of what I made, using the scraps of the old bag.

Depending on your measurements, you will need to alter this. Note that I didn't include the measurement of the curve, because I didn't calculate it myself and I didn't want to try to measure it. In this case, the bag base/side piece should be the length of the side of the bag (25cm/10in) PLUS the curve of the bag.
You'll need to cut four pieces of the bag shape, with two being mirrored (to be the opposite bag), two each of the bag side/lid, and one of the midsection. I also used interfacing on all pieces, and cut an additional piece of soft fabric for the midsection to line it.
The fabric I used is a stiff canvas-type fabric from the haberdashery section of the fabric shop. I bought a whole meter of fabric but only used half of it. I plan on making myself a matching tote from the excess. I also used a sturdy polar fleece to line the bag to make it comfier for Charlie.
You will also need straps! I bought some webbing from the fabric store. I used five meters for this project -- this was more than necessary, but Charlie is a puppy still and will need to grow. You'll also need at least two clips and one slider to complete this, as well as velcro or your closure of choice.
Step three: Sew.
I started by sewing the bag itself -- sew the 'shapes' to the base/side. The side of the bag is the 25cm/10in section. I did two rows of stitches on each piece for security.

Then adding the lid of the bag to the 30cm/12in section of the bag. I added velcro to the front and lid of the bag at this stage. Please ignore the writing on my interfacing: I didn't line these bags!

I then attached the webbing to the midsection. This part is a little more complex, as I didn't measure Charlie for this, just looped the pieces around him until they were the length I wanted and pinned them to the midsection. You'll need four pieces:

You can see here where my straps and hooks attached. The bottom piece in the photo is the chest piece, and has a sliding adjuster on it. The other two pieces go around his stomach to stabilize the bags. This part was very ad-hoc, and I am sorry that it's not clearer!
This is how the stomach straps attach:

The final piece needs a loop at the top and base of it. It doesn't have to be completely fitted, but it does need to be able to have the other two straps loop through it.
Below is a photo of this strap and the neck section. You can see how the first strap loops through and how the strap runs to the stomach section so the bag doesn't slide around when he sits.

Once your straps and hooks are attached appropriately, it's time to attach the bags to the midsection!

I opened the lids of the bags and sewed along the edge, grabbing the midsection through that to attach the two together. I also added four loops at this stage that I intend on later attaching elastic to so that Charlie can carry his own water bottle. This is the part that was the most fiddly to do -- there was already a lot of fabric folded here and it took time, but it is very secure and attached well.
And then you're done!

These bags are comfortable, stylish, and practical. Charlie doesn't have any rubbing marks on him from this build and can comfortably carry several items! We never overload him, and he seems to enjoy helping out!

You can see here how centered this is, and that it doesn't slide around even when walking. I attribute a lot of the stability to the middle strap running down his chest.
I hope this was helpful for someone, and I'd love to see any re-creations of this!
Best wishes!
Ashe

Today I thought I'd make a little tutorial for how I made this fabulous backpack for our American Bulldog, Charles! Charles is just under 50kg now, and is a very relaxed dog for the most part. We decided to make him into a helper dog, to help carry light groceries home from the store for us!
The original bags we used for him were bought on eBay, and unfortunately the zipper broke. So I dismantled them and decided to make a new, sturdier set with the velcro flaps you see here in an attempt to improve their longevity! They backing fabric on the bags and mid-section is a lovely soft fleece too, so Charlie doesn't have nasty scratchy fabric on his coat!
Charlie loves using his bags and helping us carry things home from the store, and I hope your pupper will too!
Follow through behind the cut for a brief rundown of how I made these bags!
Step one: Measure your dog!
Admittedly, I didn't do this step myself. As we had a set of bags that already fit Charlie well, I just sliced those bags up to use as a pattern. However, I will include his back measurement for you, so that you know what size dog I was working with!
Charlie is 80cm/32in from his nose to his booty, and the midsection of the bag is 25cm/10in. I think a good rule of thumb for this section will be to go 1/4 of the dog's length!
Step two: Make your pattern!
This is the measurements and vague outline of what I made, using the scraps of the old bag.
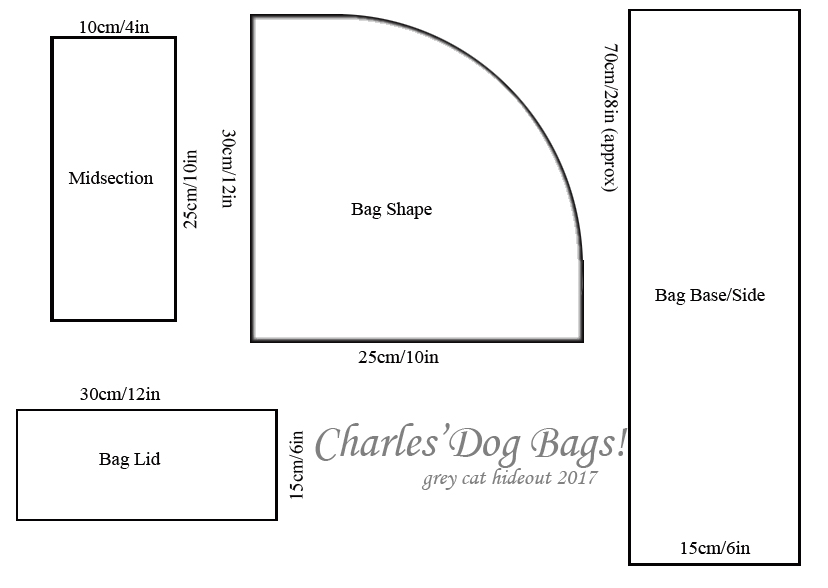
Depending on your measurements, you will need to alter this. Note that I didn't include the measurement of the curve, because I didn't calculate it myself and I didn't want to try to measure it. In this case, the bag base/side piece should be the length of the side of the bag (25cm/10in) PLUS the curve of the bag.
You'll need to cut four pieces of the bag shape, with two being mirrored (to be the opposite bag), two each of the bag side/lid, and one of the midsection. I also used interfacing on all pieces, and cut an additional piece of soft fabric for the midsection to line it.
The fabric I used is a stiff canvas-type fabric from the haberdashery section of the fabric shop. I bought a whole meter of fabric but only used half of it. I plan on making myself a matching tote from the excess. I also used a sturdy polar fleece to line the bag to make it comfier for Charlie.
You will also need straps! I bought some webbing from the fabric store. I used five meters for this project -- this was more than necessary, but Charlie is a puppy still and will need to grow. You'll also need at least two clips and one slider to complete this, as well as velcro or your closure of choice.
Step three: Sew.
I started by sewing the bag itself -- sew the 'shapes' to the base/side. The side of the bag is the 25cm/10in section. I did two rows of stitches on each piece for security.

Then adding the lid of the bag to the 30cm/12in section of the bag. I added velcro to the front and lid of the bag at this stage. Please ignore the writing on my interfacing: I didn't line these bags!

I then attached the webbing to the midsection. This part is a little more complex, as I didn't measure Charlie for this, just looped the pieces around him until they were the length I wanted and pinned them to the midsection. You'll need four pieces:
- One around his neck and to the back of his shoulder blades, where the straps connect around his chest to the bag, to keep it stable.
- One around his tummy, towards the front of the rib cage and under his armpits.
- One around the back of his tummy, at the base of his ribs and towards the back of the midsection piece.
- One final piece that runs from the base of the chest strap to the base of the final strap. This is to keep the straps appropriately separated and stabilized.

You can see here where my straps and hooks attached. The bottom piece in the photo is the chest piece, and has a sliding adjuster on it. The other two pieces go around his stomach to stabilize the bags. This part was very ad-hoc, and I am sorry that it's not clearer!
This is how the stomach straps attach:

The final piece needs a loop at the top and base of it. It doesn't have to be completely fitted, but it does need to be able to have the other two straps loop through it.
Below is a photo of this strap and the neck section. You can see how the first strap loops through and how the strap runs to the stomach section so the bag doesn't slide around when he sits.

Once your straps and hooks are attached appropriately, it's time to attach the bags to the midsection!

I opened the lids of the bags and sewed along the edge, grabbing the midsection through that to attach the two together. I also added four loops at this stage that I intend on later attaching elastic to so that Charlie can carry his own water bottle. This is the part that was the most fiddly to do -- there was already a lot of fabric folded here and it took time, but it is very secure and attached well.
And then you're done!

These bags are comfortable, stylish, and practical. Charlie doesn't have any rubbing marks on him from this build and can comfortably carry several items! We never overload him, and he seems to enjoy helping out!

You can see here how centered this is, and that it doesn't slide around even when walking. I attribute a lot of the stability to the middle strap running down his chest.
I hope this was helpful for someone, and I'd love to see any re-creations of this!
Best wishes!
Ashe
Comments
Post a Comment